1How costing works
RecipePricing answers one question: what does one batch, and one serving, of this recipe cost me, and what should I charge for it? To answer it, the app needs four kinds of information, and it helps to enter them in this order.
Unit measures
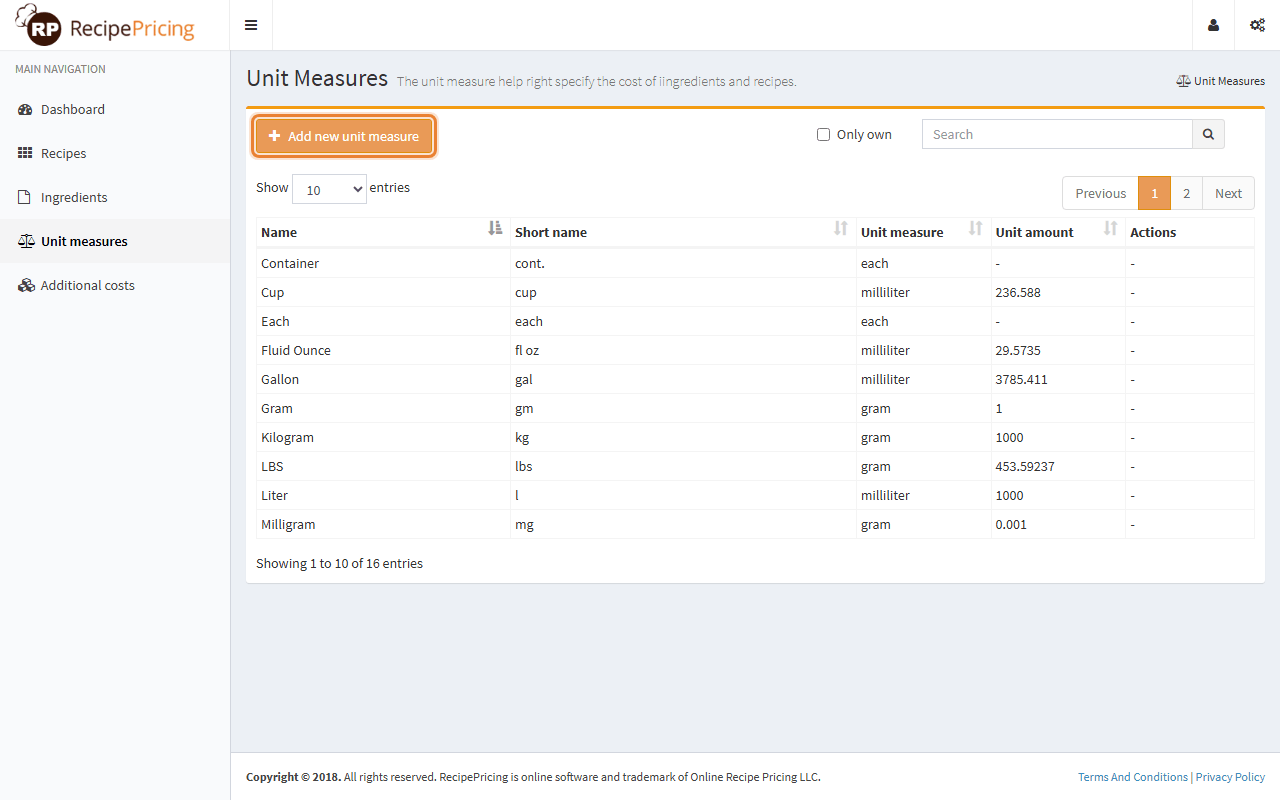
The units you buy and cook in. Weight units are based on grams, volume units on milliliters, and container units on "each". The standard list is ready to use; you can add your own.
Ingredients
One entry per thing you buy: name, the quantity you bought and the total price. The app works out the cost per unit, and can convert between weight and volume.
Additional costs
Overheads such as an oven, packaging or rent, spread over their lifetime and over the number of items you sell each month. Optional, and used inside recipes.
Recipes
Where it all comes together. Add ingredients in any unit, add labor time and overheads, choose a profit margin, and read the cost and price per batch and per serving.
You enter what you paid for a whole purchase (for example 25 kg of flour for $18.50). In a recipe you use a small part of it (500 g). RecipePricing does the division for you, converting units on the way, so every recipe line shows exactly what that quantity cost.
2Create your account
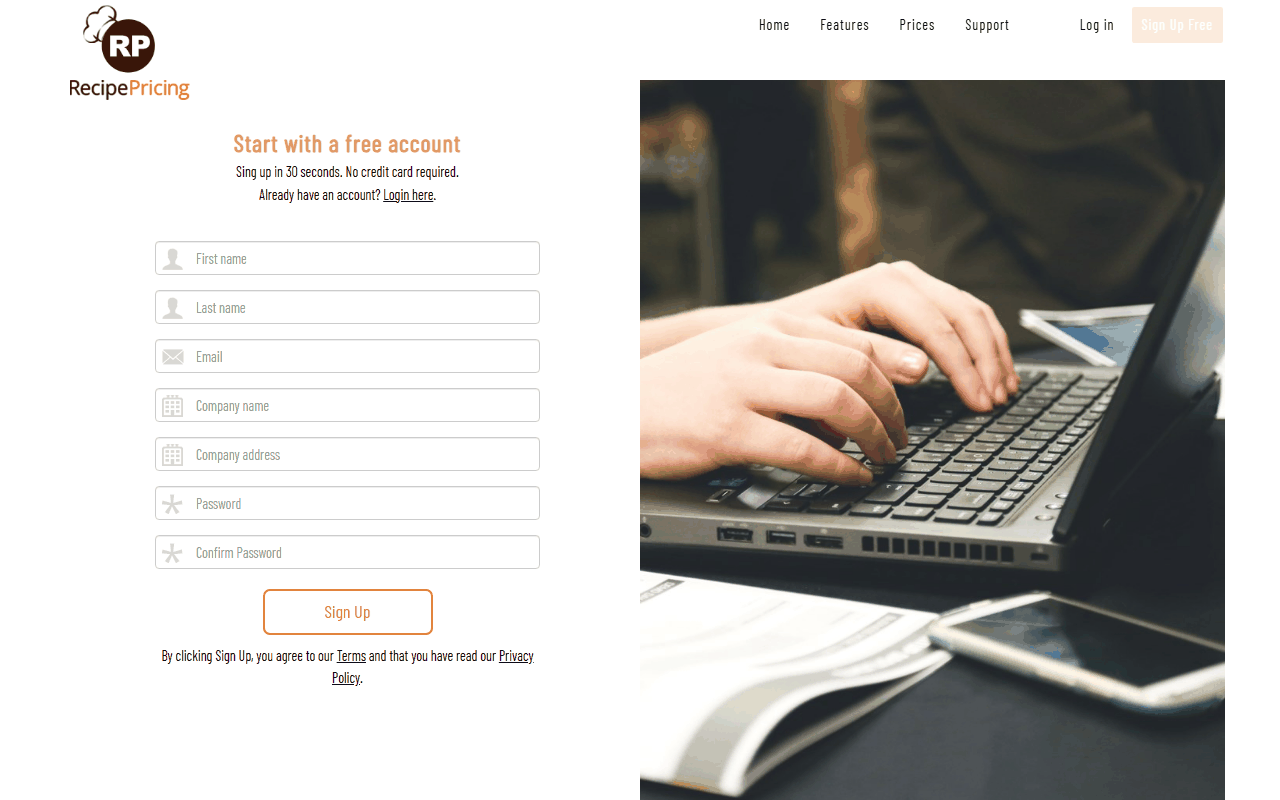
Sign up and verify your email
- Open recipepricing.com/registration or click Sign Up Free at the top of any page.
- Fill in your first name, last name, email, company name, company address, and a password (twice). All fields are required; names need at least 3 characters and the password at least 6.
- Click Sign Up. The page confirms that a verification email was sent.
- Open the email from the Recipe Pricing team and click the confirmation link. If you do not see it after a few minutes, check your spam folder.
- The "Your account has been successfully verified" page has a link straight into your account.
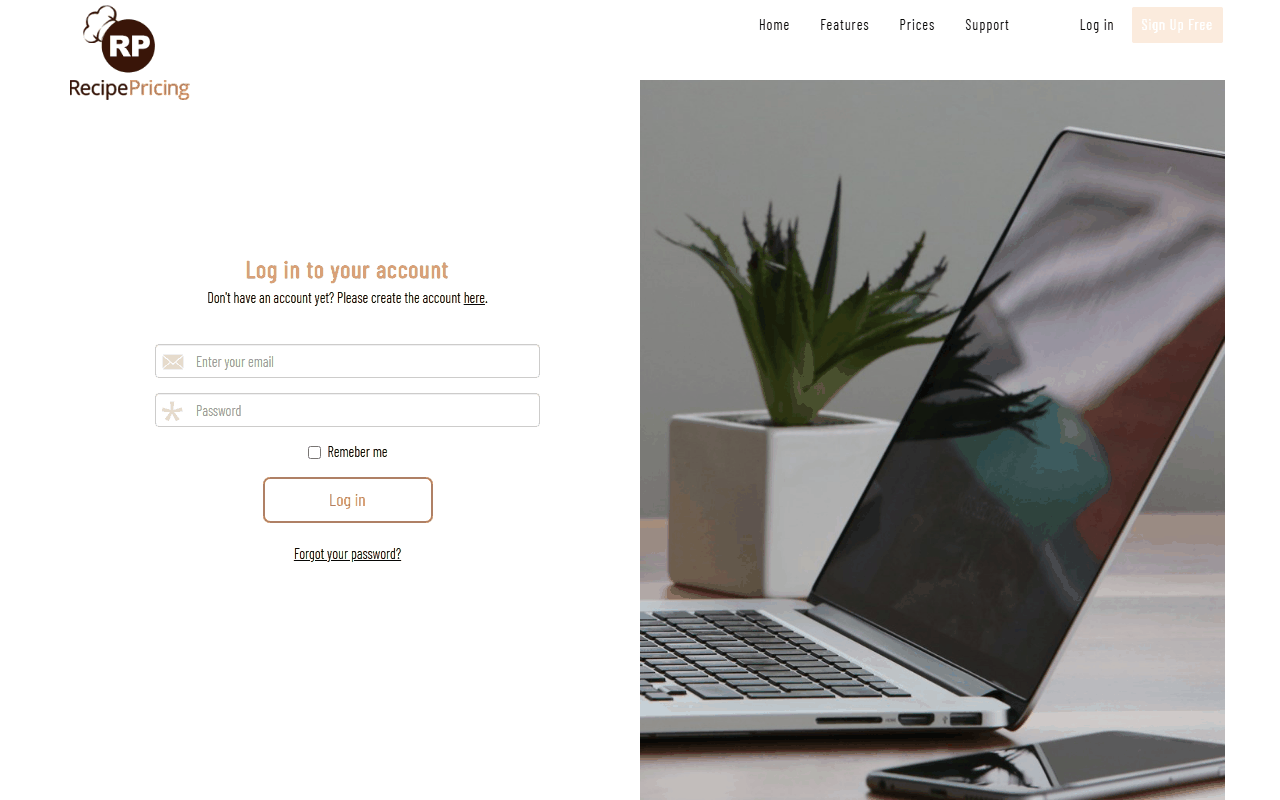
From then on, sign in at recipepricing.com/login with your email and password. Tick Remember me to stay signed in on your own computer. If you forget your password, use the Forgot your password? link under the form; a reset link is emailed to you.
The dashboard and navigation
After signing in you land on the dashboard. It shows how many recipes, ingredients, unit measures and additional costs you have, and each tile links to its page.
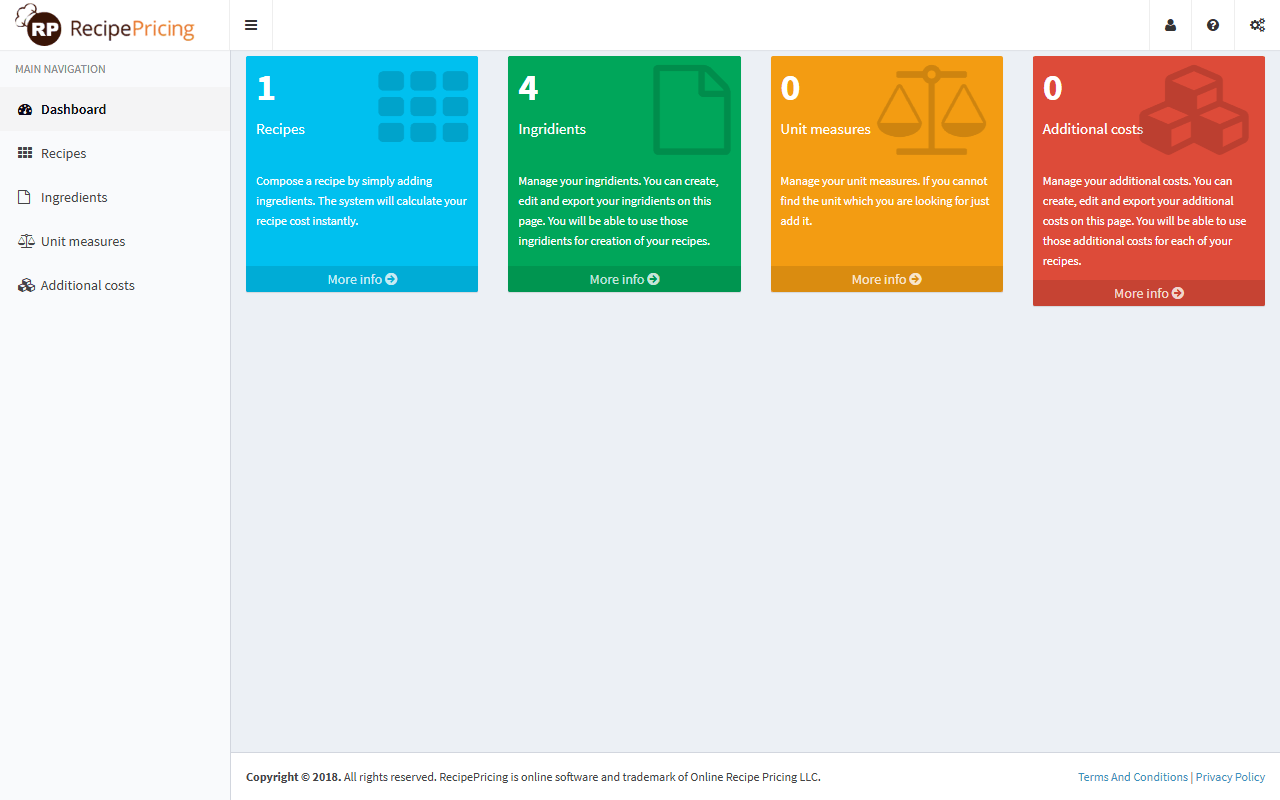
- Left sidebar: Dashboard, Recipes, Ingredients, Unit measures, Additional costs. The button in the header shrinks it to icons; on a phone it opens and closes it.
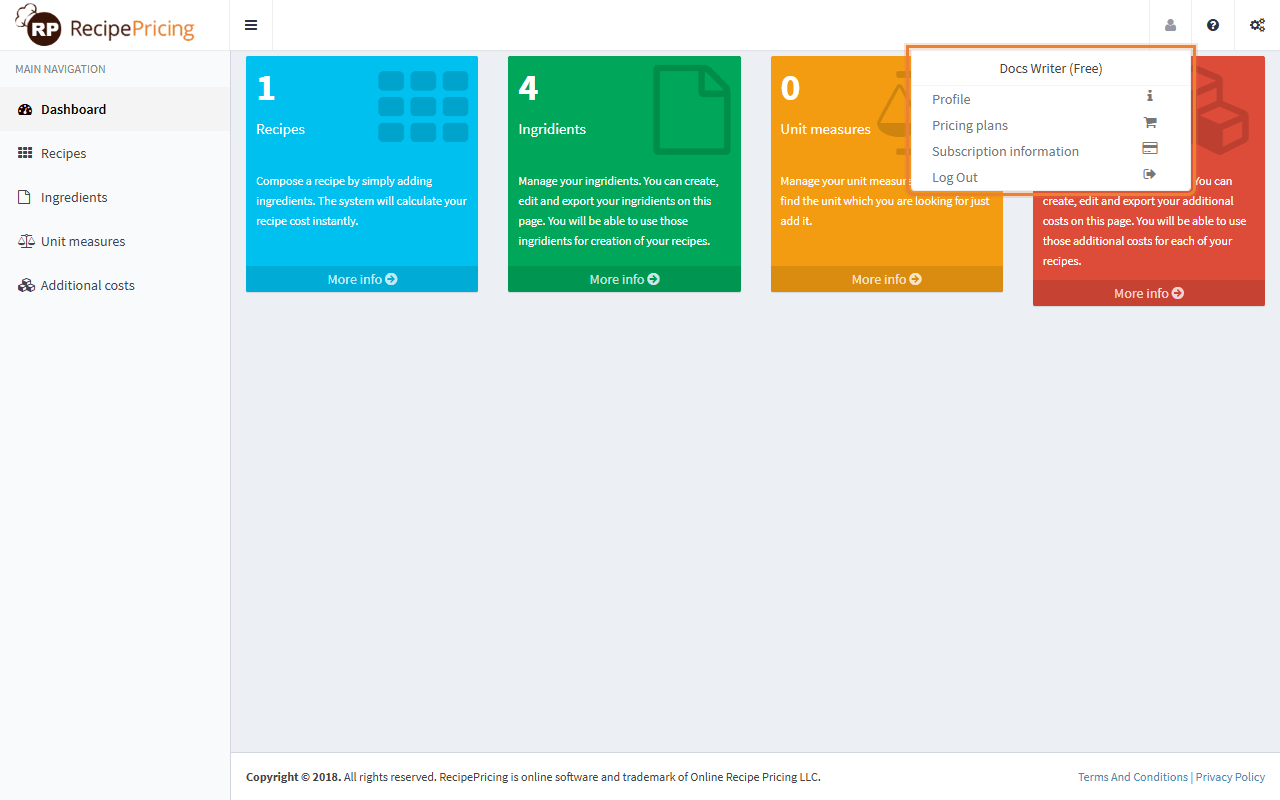
- User menu (the icon, top right): Profile, Pricing plans, Subscription information, Log Out. On the Profile page you can change your name and company details and request a password reset email; your email address itself can only be changed through support.
- Settings panel (the icon): your name, company, and your current plan with its expiry date.
- User guide (the icon): opens this page in a new tab.
The four counts on the dashboard are read when the page loads. After adding items, reload the browser page to see the new numbers.
3Unit measures
Every quantity in RecipePricing has a unit. The standard list covers the usual kitchen and warehouse units, so most people never need this page. Read it if you buy in a unit that is missing, for example a case, a tray or a stick of butter.
Units come in three types. Each type has a base unit, and every unit is defined by how many base units it contains:
| Type | Base unit | Examples | Converts with |
|---|---|---|---|
| Weight | gram | kilogram, pound, ounce | other weight units; volume units when the ingredient has a unit conversion |
| Volume | milliliter | liter, cup, tablespoon, fluid ounce, gallon | other volume units; weight units when the ingredient has a unit conversion |
| Container | each | piece, pack, can | nothing: an ingredient bought per piece is used in recipes in that same unit only |
Add your own unit
- Open Unit measures in the sidebar and click Add new unit measure.
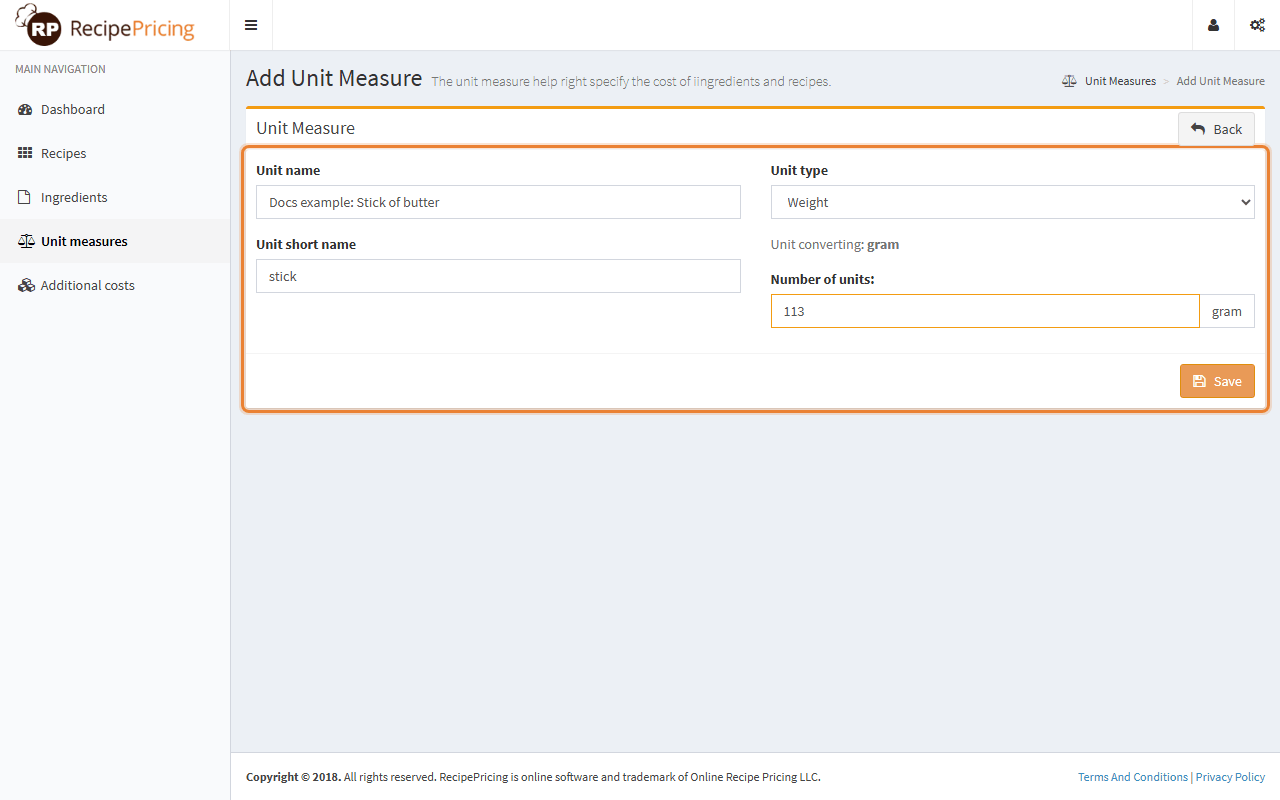
- Enter a Unit name (2 to 50 characters, for example Stick of butter) and a Unit short name (stick). The short name is what you see in dropdowns. Both must be different from every existing unit, standard ones included, so a second "kg" is refused.
- Choose the Unit type. The base unit appears next to the last field.
- Enter the Number of units: how many base units one of your units contains. One stick of butter weighs 113 grams, so type 113. One pound is 453.592 grams; one gallon is 3785.41 milliliters. Container units have no number: the field is switched off for them.
- Click Save. You return to the list and the unit is now available everywhere a unit is chosen.
Adding and editing your own unit measures is included from the Standard plan. On the Free plan the standard units are available and the Add new unit measure button shows a "Low subscription" message. See Plans and limits.
4Ingredients
An ingredient is anything you buy and put into a recipe. Enter it once, with the quantity and price of a real purchase, and use it in as many recipes as you like.
Add an ingredient
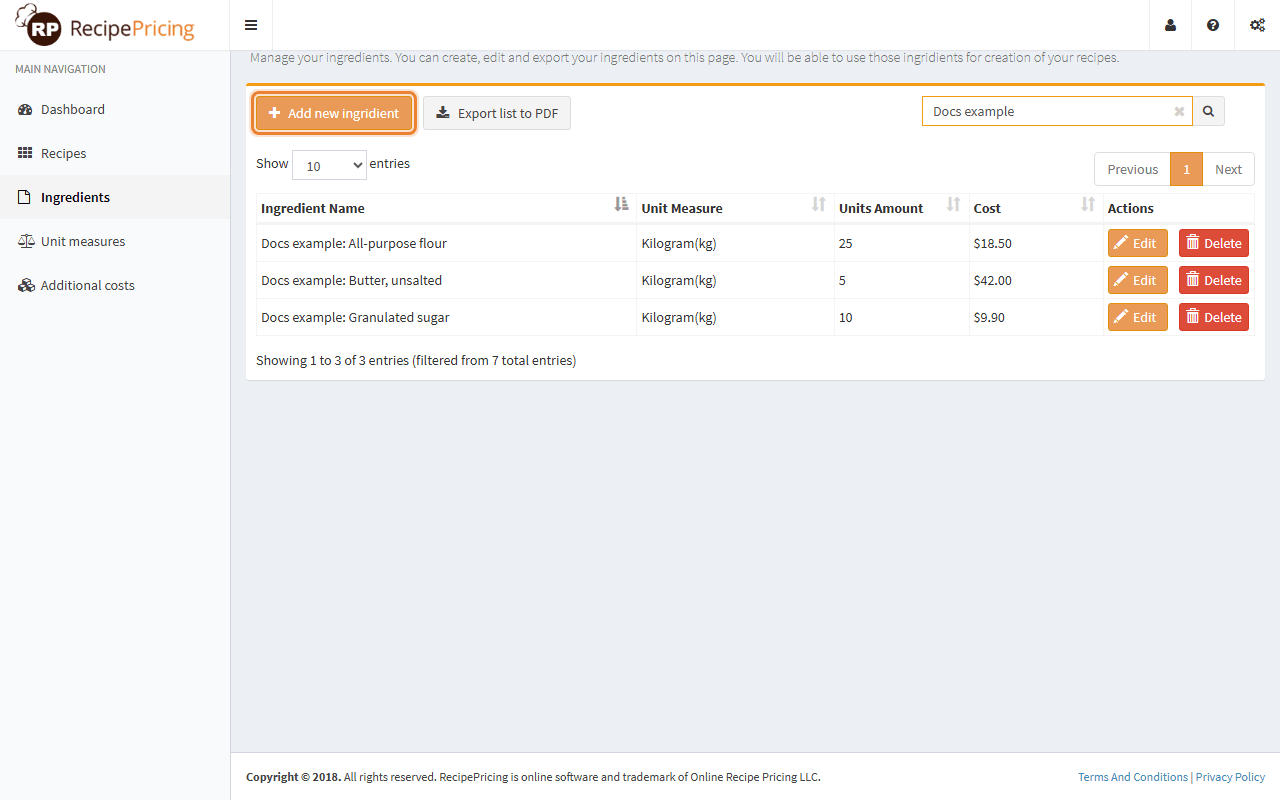
- Open Ingredients in the sidebar and click Add new ingredient.
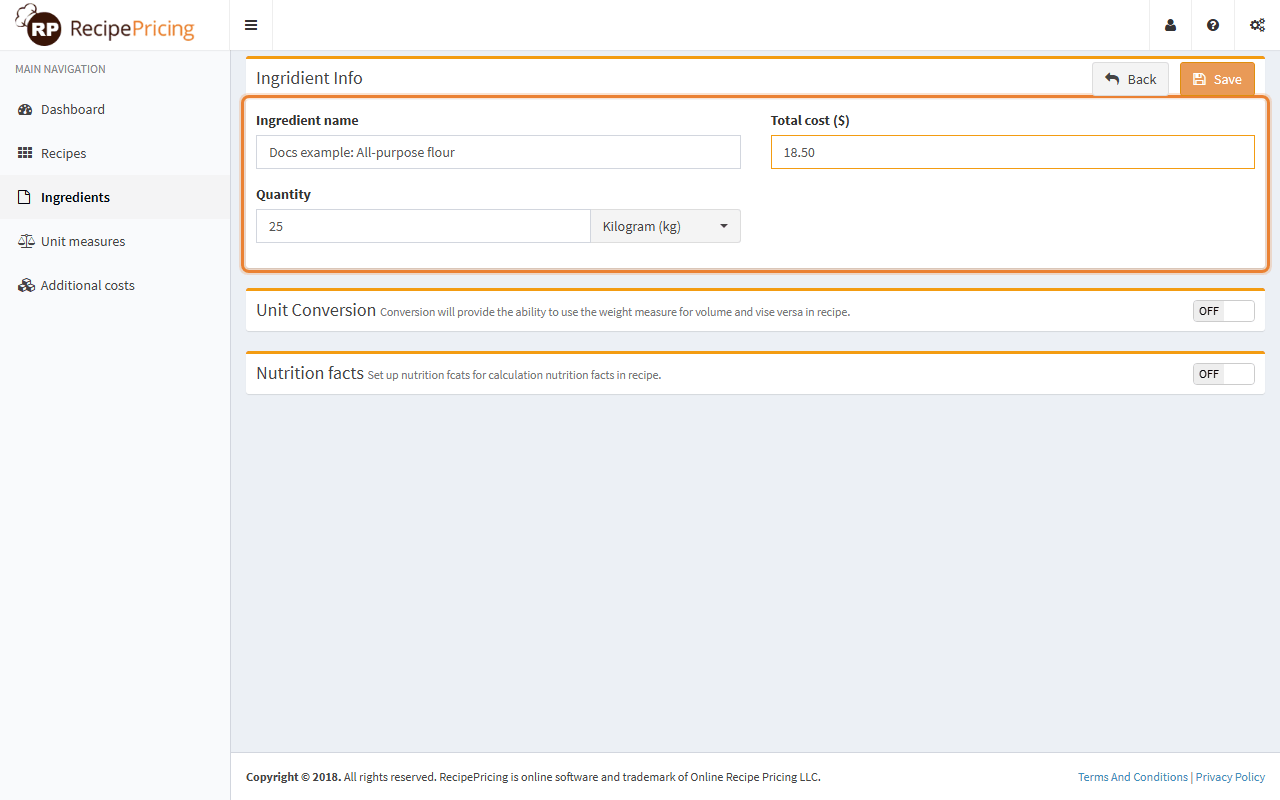
- In Ingredient Info, type the Ingredient name (2 to 50 characters). Use the name you use when shopping, for example All-purpose flour.
- Enter the Quantity you bought and pick its unit from the dropdown next to it: 25 and kilogram.
- Enter the Total cost you paid for that quantity, in dollars, as a plain number: 18.50. Do not enter the price per kilogram; the app divides for you.
- Click Save. A green notification confirms it and you return to the list.
Prices change. When you buy the same ingredient at a new price, edit it and enter the new quantity and total cost. Every recipe that uses it picks up the new cost the next time you open it.
Unit conversion: weight and volume
You bought oil by the gallon, but the recipe needs 10 grams. Grams are a weight, gallons are a volume, and how much a milliliter weighs depends on the ingredient. The Unit Conversion box tells the app the density of this ingredient, and from then on you can use any weight or volume unit for it in recipes.
- Fill in Ingredient Info first (quantity and unit), then switch the toggle in the Unit Conversion box header on. The box expands.
- The box shows the Weight of ingredient and the Volume of ingredient for the whole quantity you bought. The side that matches your purchase unit is filled in for you and locked (25 kilogram for the flour). You supply the other side.
- Either type it yourself if you know it (25 kg of flour is about 200 cups)…
- …or let the app calculate it. Under Similar food searching, optionally filter by food group, type the food's name such as Wheat flour and click the closest match in the results. The search matches the Name column only; the variety (white, all-purpose, whole-grain…) is in the Characteristics column, so search for the short name and pick the right row. The chosen food appears under Attached similar food item with its weight per cup, and the missing side is calculated from it at once.
- Click Save in the Ingredient Info box. Changes in the lower boxes are only stored when you save the ingredient.
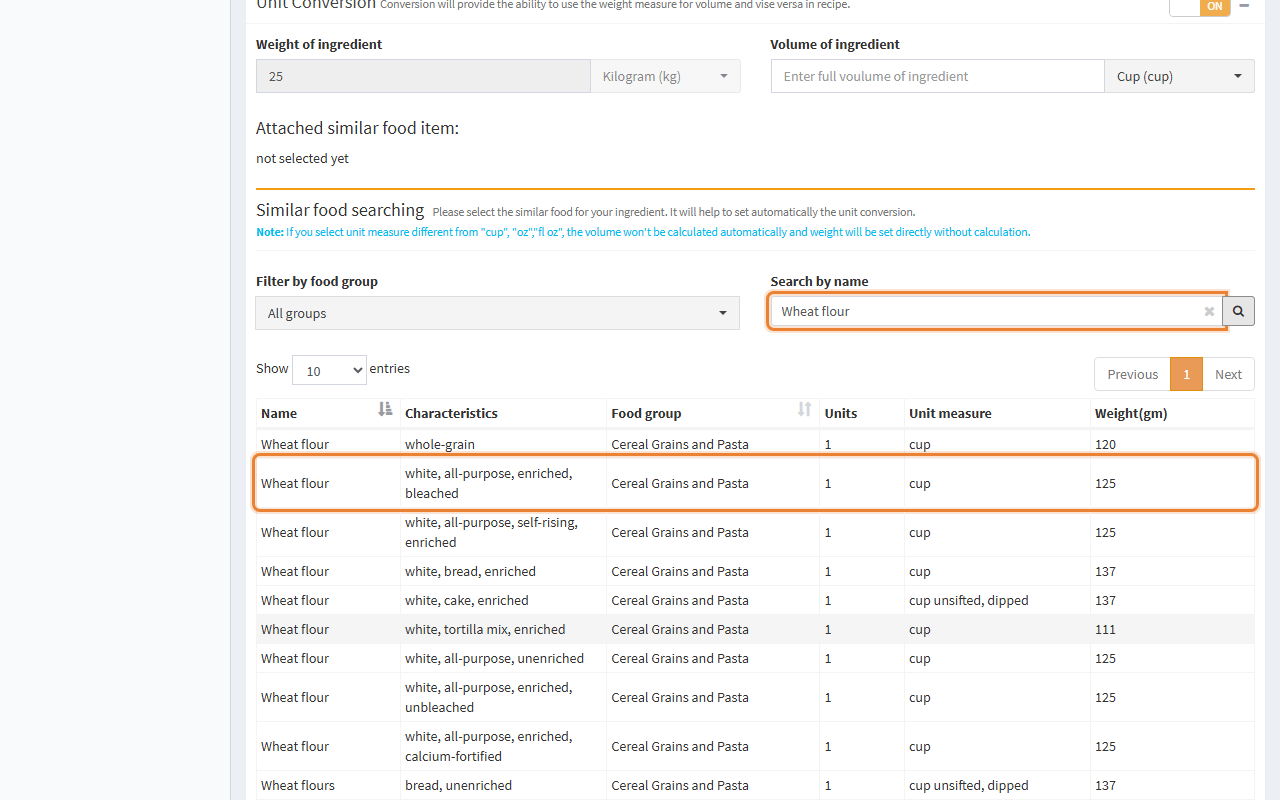
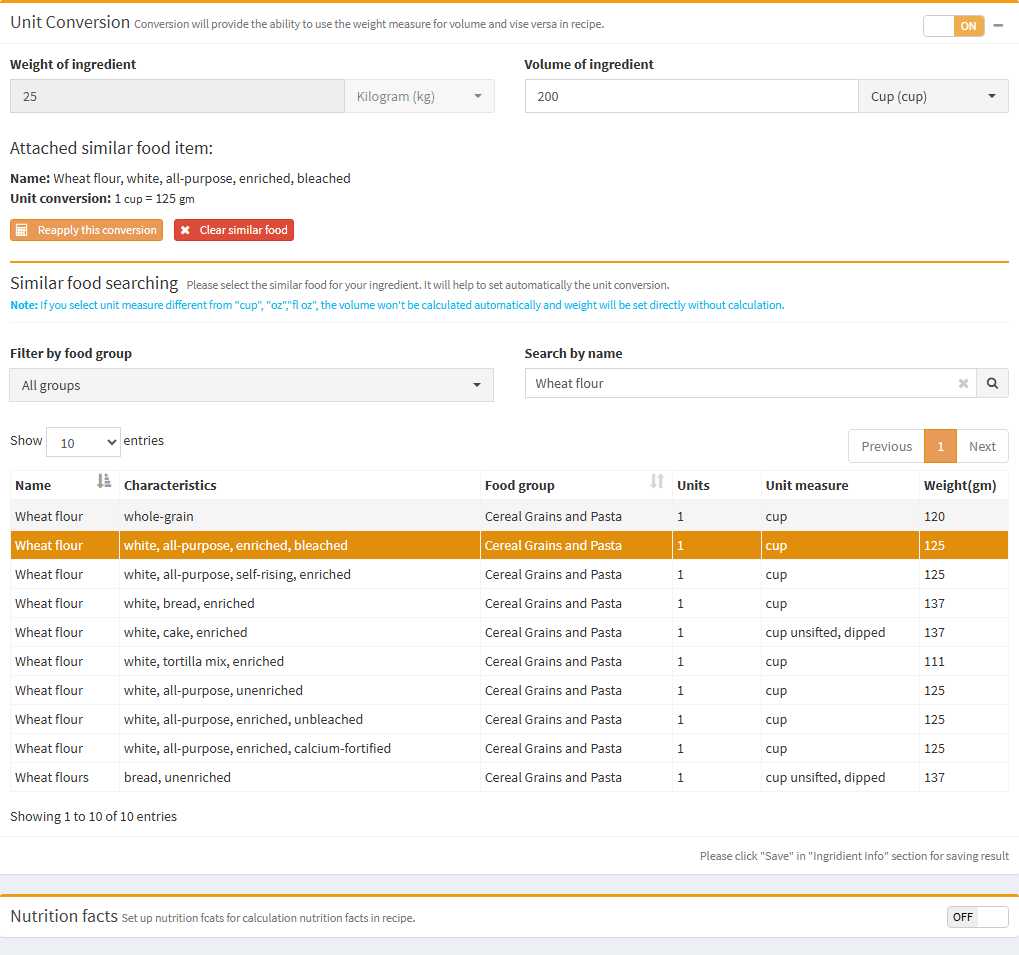
The calculation works when the USDA entry is measured in cups, fluid ounces, tablespoons or teaspoons. For entries measured in other ways (a slice, a piece) only the weight can be filled in and you enter the matching volume yourself.
Nutrition facts
If you want a nutrition label for your recipes, each ingredient needs its nutrition facts per 100 grams. As with the conversion, you can type them or take them from the USDA database.
- Switch the toggle in the Nutrition facts box header on. The box expands.
- Fill in the values per 100 g: energy (kcal, a whole number), total fat, saturated fat, cholesterol, trans fat, sodium, total carbohydrate, sugar, dietary fiber, protein, vitamin A, vitamin C, calcium and iron. Energy, total fat, carbohydrate and protein are required; the rest may stay empty. The label on the right updates as you type.
- Or search a similar food, exactly as for the conversion, and click a result. All fourteen values are replaced with the USDA values.
- Click Save in the Ingredient Info box.
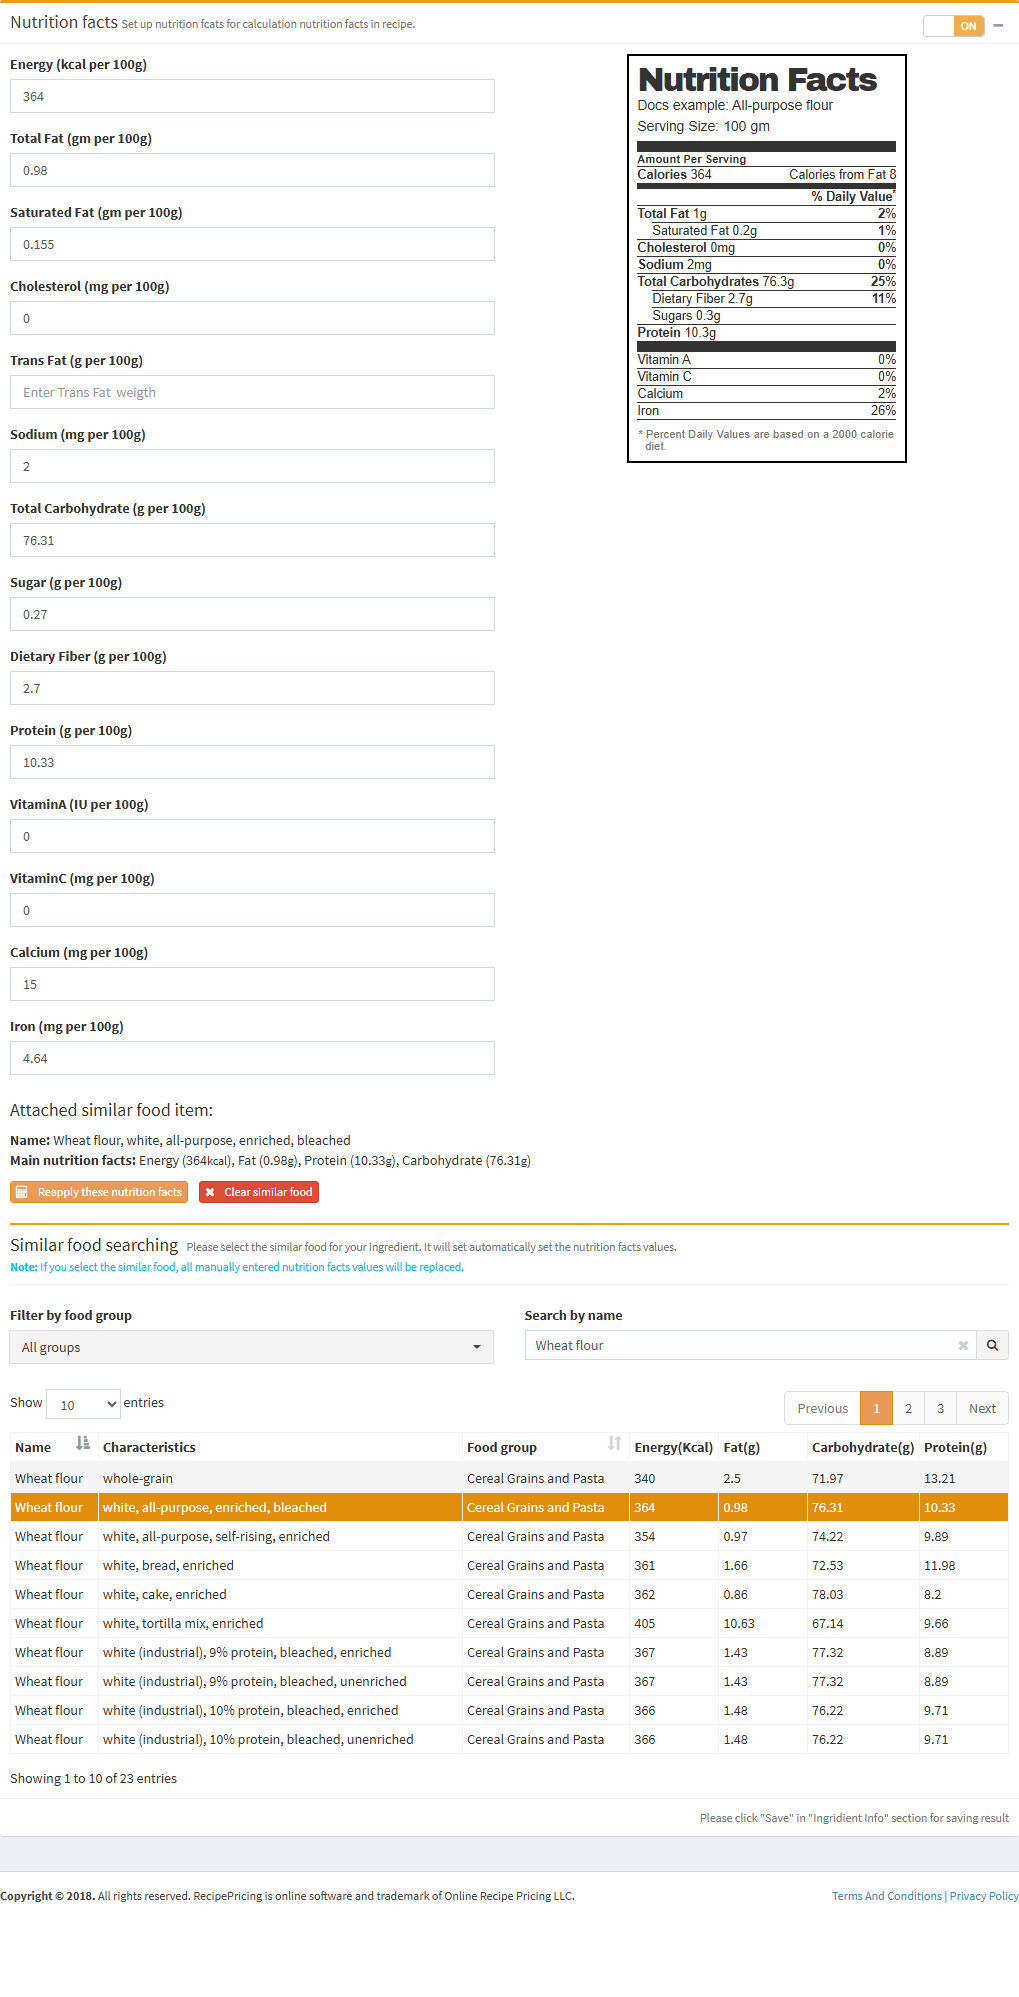
Nutrition facts are per 100 g, so the app must know the weight of the ingredient. If you bought it by volume or per piece, set up the unit conversion first; otherwise saving stops with "You can't use nutrition facts without the weight of ingredient."
A recipe's nutrition label is built only from the ingredients that have nutrition facts. Give every ingredient its facts and the label is right; leave some out and the label understates the values.
Manage the list
- Search: type in the search box at the top right; the list filters by ingredient name as you type. Click the to clear.
- Edit: click Edit on a row. The conversion and nutrition boxes open collapsed; switch or expand them to see their values.
- Delete: click Delete and confirm. An ingredient that is still used in a recipe should be removed from the recipe first.
- Export list to PDF: a PDF of your whole ingredient list with unit, quantity and total cost (Medium plan and above).
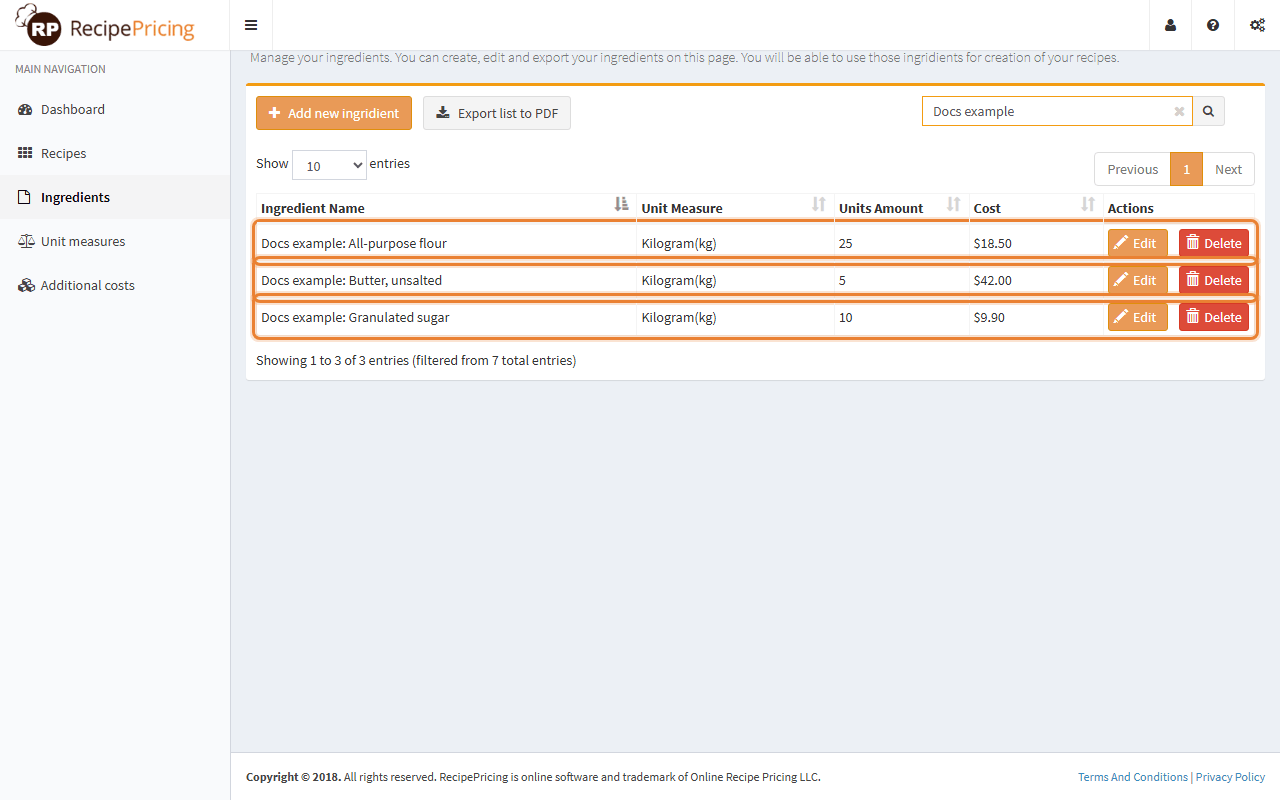
The Free plan allows up to 110 ingredients, Standard up to 1,000, Medium and Enterprise unlimited. When you reach the limit, Add new ingredient shows a "Low subscription" message.
5Additional costs
Ingredients are not your only cost. An oven, a mixer, packaging, rent or electricity also have to be paid for by the things you sell. The Additional costs page turns a big one-time or monthly amount into a small cost per item sold, which you can then add to any recipe.
The page has two parts. The setting at the top applies to all additional costs; the list below holds the costs themselves.
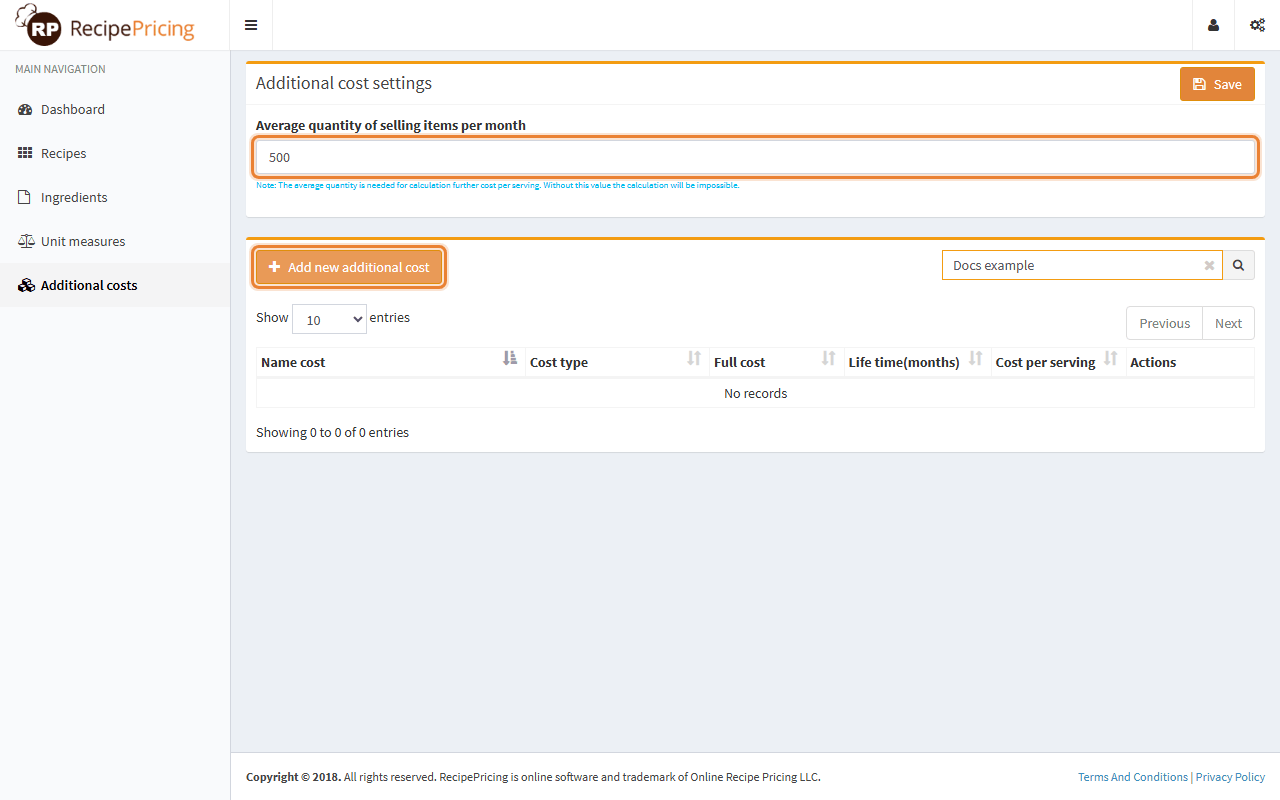
Step 1: how many items do you sell per month?
- Open Additional costs in the sidebar.
- In Additional cost settings, enter the Average quantity of selling items per month, a whole number such as 500. Count servings, not batches: if you sell 20 cakes a day, about 500 a month.
- Click Save in that box. Until it is saved, Add new additional cost answers with "Please enter the Average quantity of selling items per month first."
Step 2: add a cost
- Click Add new additional cost.
- Enter the Name cost, for example Convection oven.
- Choose the Type of cost. A short explanation of the chosen type appears under the dropdown.
- Enter the Life time of using item in months, a whole number: over how many months the cost should be spread. An oven you expect to use for five years: 60. A monthly bill such as rent: 1.
- Enter the Full cost of item in dollars as a plain number: 2400.
- The Additional cost per serving on the right updates when you leave the field. Click Save.
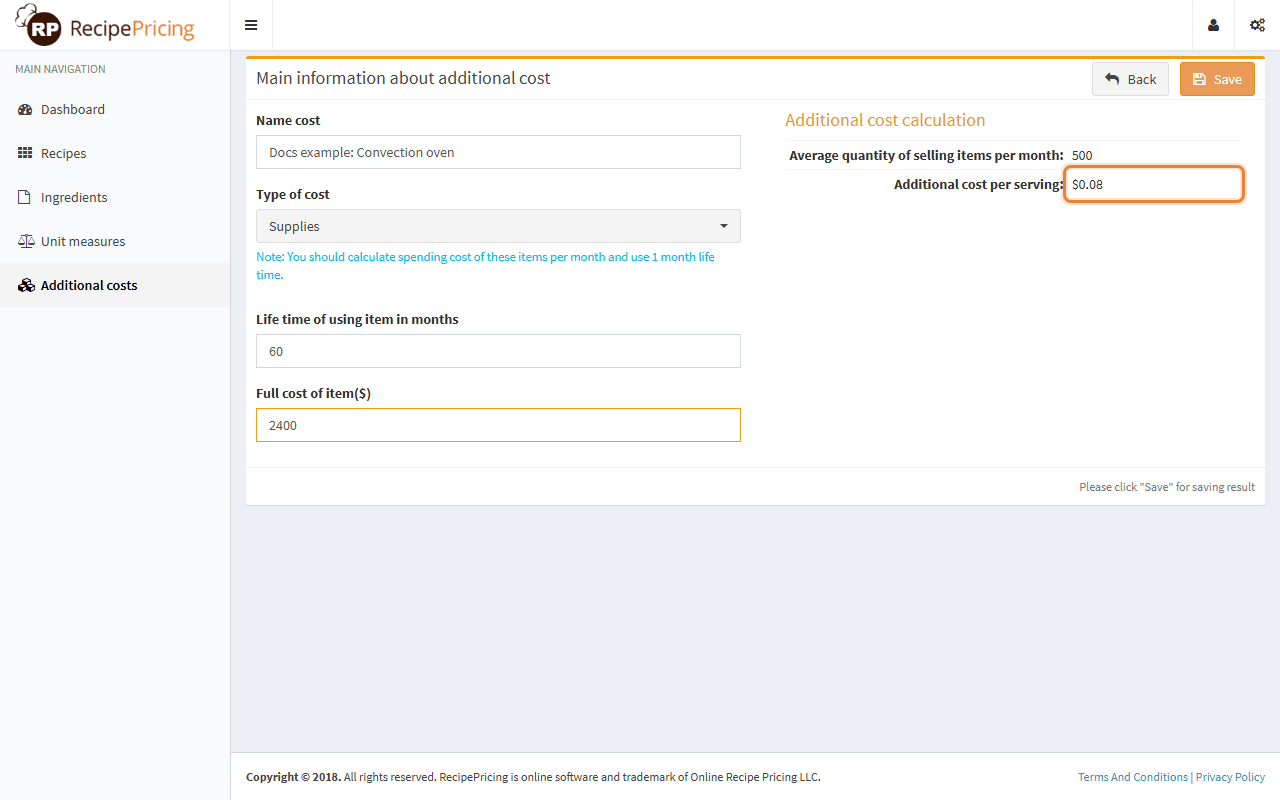
Each saved cost appears in the list with its type, full cost, life time and cost per serving. In a recipe, one click adds all of them at once (see Additional costs in a recipe). Each cost keeps the per-serving figure from its last save: if you change the average quantity later, open each cost, re-enter its full cost and save it again.
Calculation of additional costs is an Enterprise feature. The page is visible on every plan, but adding costs and switching the section on inside a recipe show a "Low subscription" message on lower plans.
6Recipes
A recipe is a list of ingredient quantities plus, if you want them, labor and additional costs. The form is one long page made of boxes: Recipe Info at the top and five boxes below it, collapsed until you open them with the button on their right.
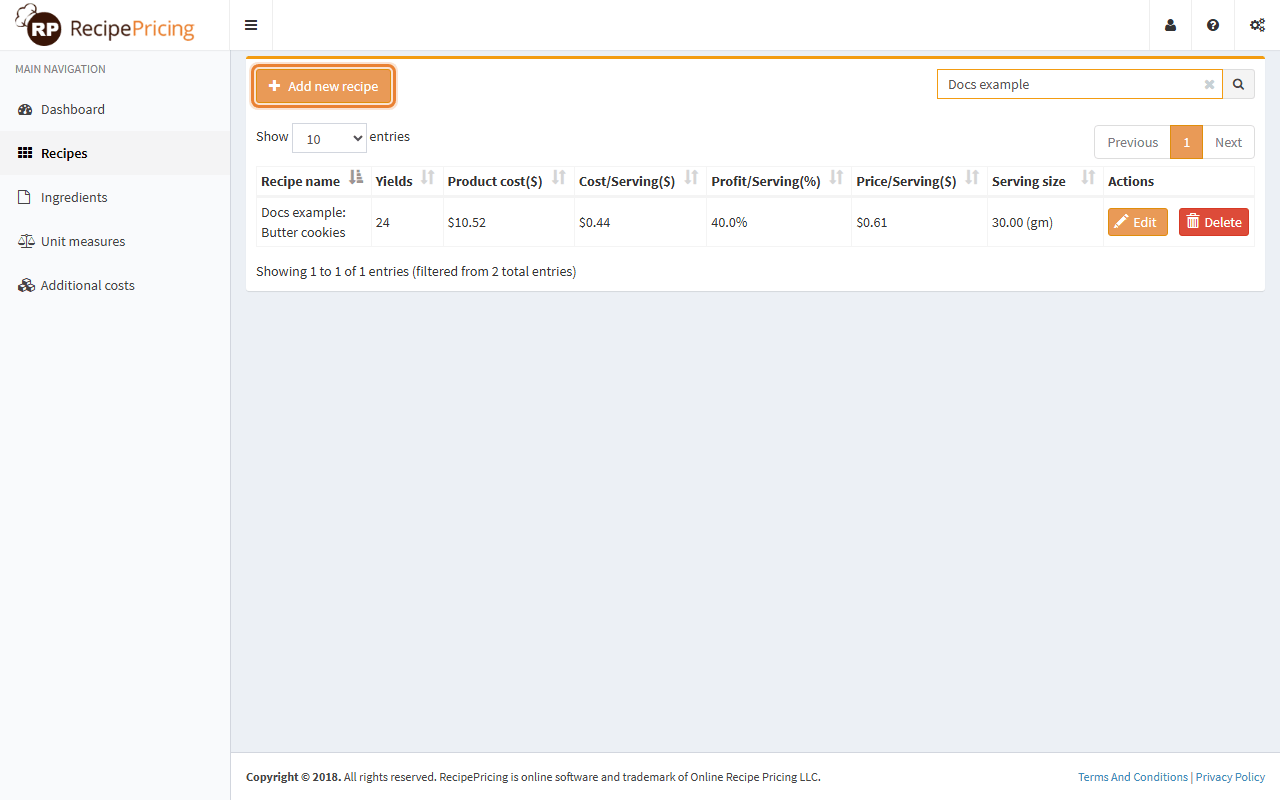
Recipe info
- Open Recipes in the sidebar and click Add new recipe.
- Enter the Recipe name.
- Enter the Serving yields: how many servings (pieces, portions, jars) one batch of this recipe makes. A whole number, at least 1. All "per serving" figures divide by this number.
- Enter the Serving size and its unit, for example 30 gram. It is shown in the recipe list and printed on the PDF.
- Choose how you want to price the recipe with the two radio buttons:
- Profit margin (%): you enter the margin, the app calculates the price. This is the mode the form always opens in.
- Price/Serving ($): you enter the selling price per serving, the app calculates the margin. The price must be higher than the cost per serving; a price at or below cost is treated as no profit.
The figures recalculate when you leave a field (press Tab or click elsewhere), not while you type.
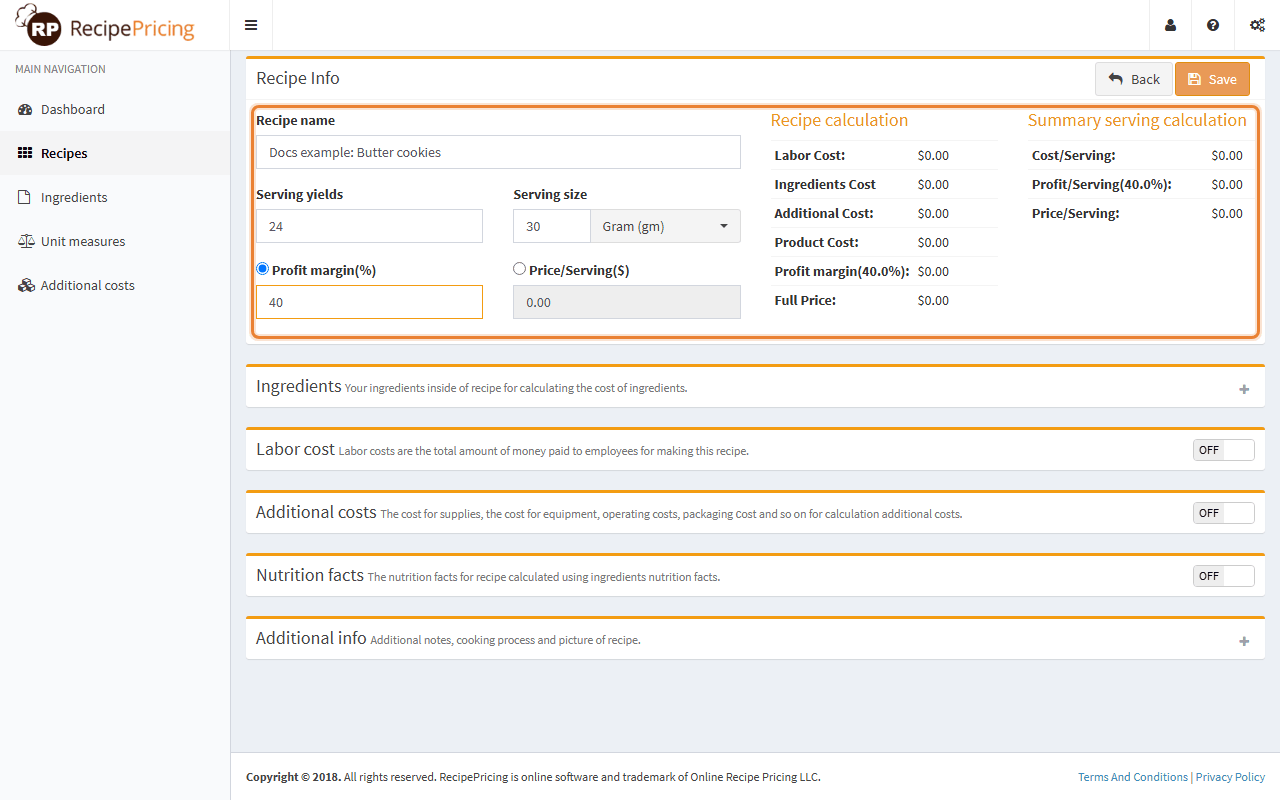
Every box below has a footer that says "Please click Save in Recipe Info section". Ingredients, labor and costs you add are calculated on screen immediately, but they are stored only when you click Save in the Recipe Info box at the top.
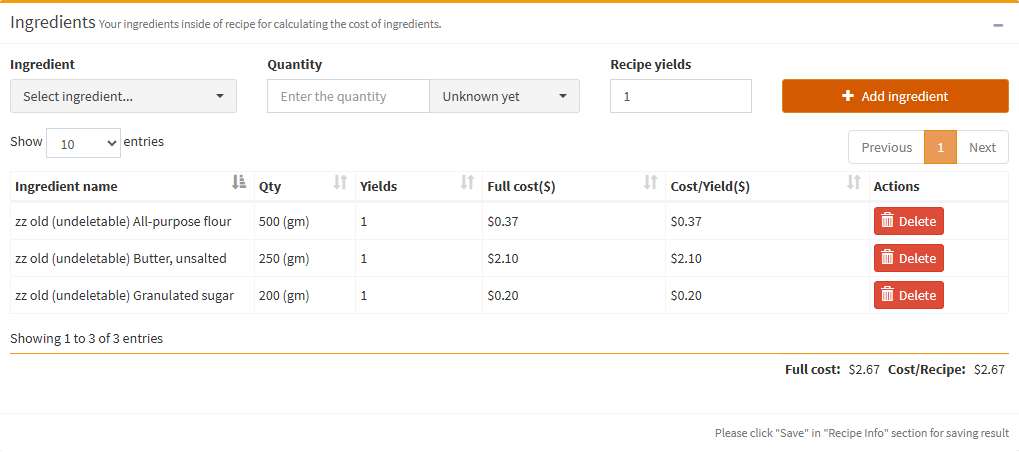
Add the ingredients
- Open the Ingredients box with its button.
- Pick an Ingredient. The dropdown is searchable: click it and start typing. Each entry shows the ingredient with the quantity you bought, for example 25 (kg).
- Enter the Quantity. The field is pre-filled with the whole amount you bought, so replace it with the amount the recipe uses. Then pick the unit. The unit list appears after you choose the ingredient and contains only units the app can convert for it: weight units for something bought by weight, volume units for something bought by volume, both when the ingredient has a unit conversion, and only its own unit for something bought per piece.
- Leave Recipe yields at 1 unless the quantity you entered is enough for several batches; then enter how many batches it makes. The cost that goes into the recipe is divided by this number.
- Click Add ingredient. The row appears in the table with its cost, and the totals at the bottom and in Recipe Info update.
- Repeat for every ingredient. Rows cannot be edited: to change one, click its Delete button and add it again.
Labor cost
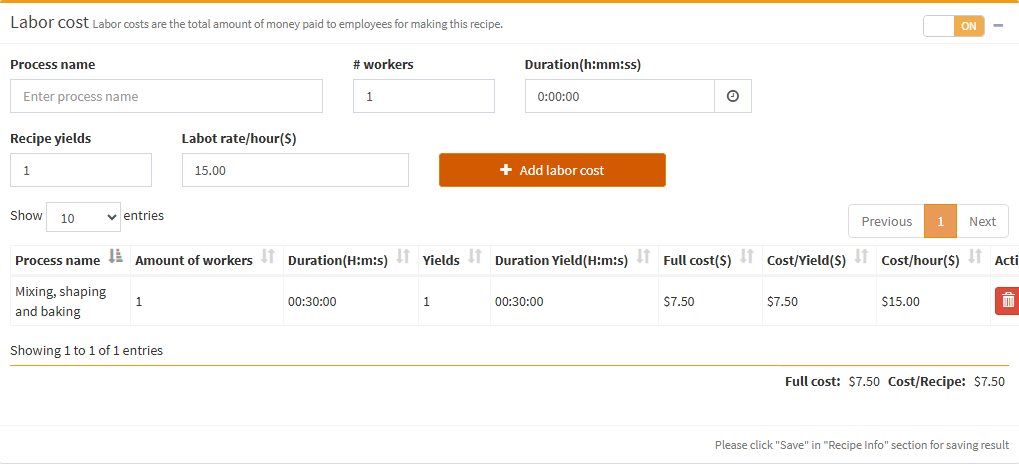
Labor cost is the wages paid for the time spent making one batch. Open the Labor cost box and switch its toggle on to use it.
- Enter a Process name, for example Mixing and baking. You can add several processes.
- Enter the number of workers on that process and the Duration one worker spends on it. Click into the field to open the time picker, or type the time as hours:minutes:seconds, for example 0:30:00. A row can be at most 23:59:59; use more workers or more rows for longer work.
- Set Recipe yields if this process makes more than one batch at a time, otherwise leave 1.
- Enter the Labor rate/hour in dollars (it starts at 10.00 and keeps your last value for the next row) and click Add labor cost.
Additional costs
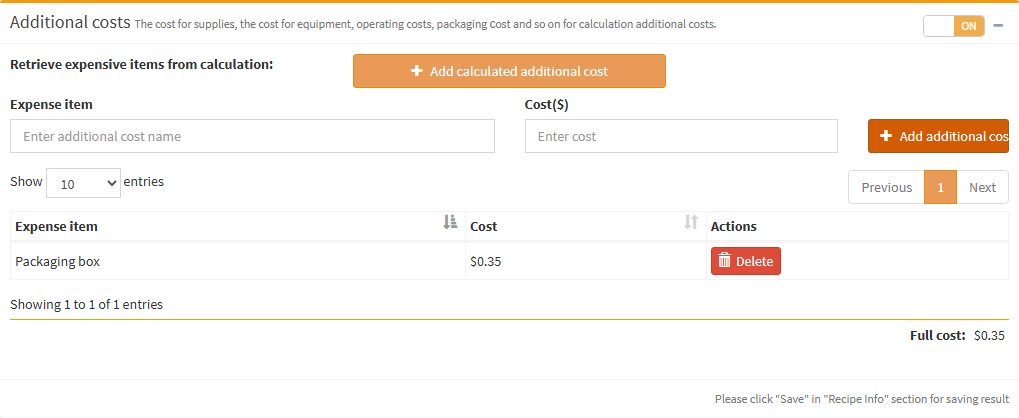
Open the Additional costs box and switch it on. There are two ways to add a cost:
- Add calculated additional cost takes every cost from your Additional costs page and adds each one as a row, using its cost per serving. Rows are matched by name, so clicking it again after changing that page updates the existing rows instead of duplicating them. If the page is empty you see "Nothing to add."
- An Expense item with a Cost in dollars, for example Packaging box, 0.35, then Add additional cost. Use this for costs that belong to this recipe only. The cost must be greater than zero.
Nutrition facts
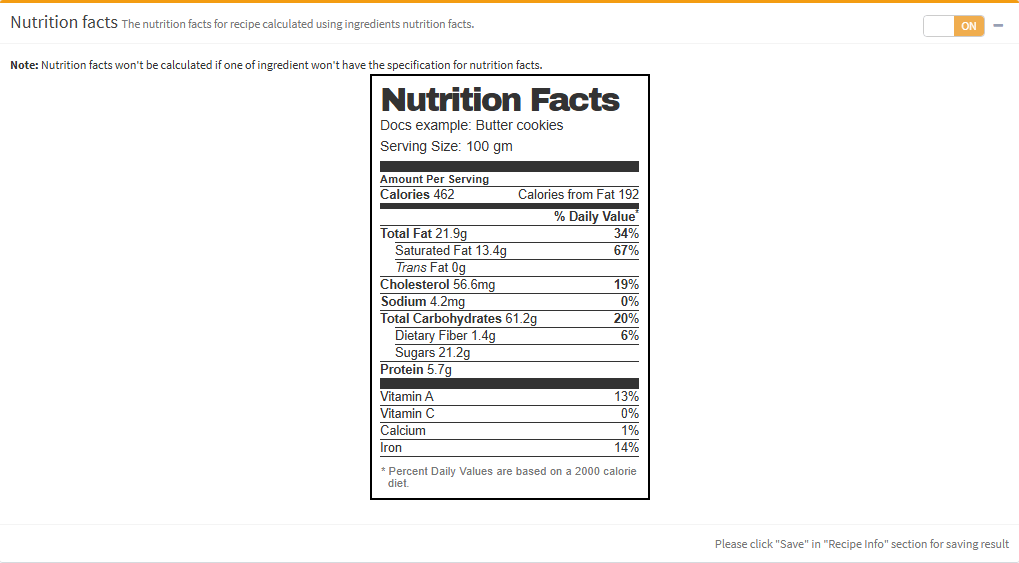
Switch the Nutrition facts box on to see a nutrition label for the recipe. The label is always given per 100 g of the finished recipe; it is built from each ingredient's per-100 g values weighted by the amount used. The box can only be opened while its switch is on.
Only ingredients that have nutrition facts are counted. If none of them has, a red message tells you so; if some of them have, a label appears but it leaves out the ingredients without facts and so understates the real values. For an accurate label, give every ingredient in the recipe its nutrition facts.
Notes and cooking process
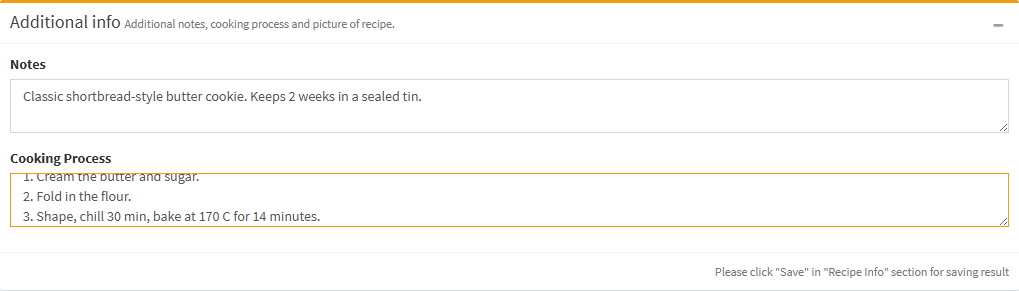
The Additional info box has two free-text fields, Notes and Cooking Process, up to 500 characters each. Both are printed on the PDF, which makes the PDF a complete recipe card for the kitchen.
Reading the calculation
The two tables in the Recipe Info box update every time you change anything. The left table is per batch, the right one per serving.
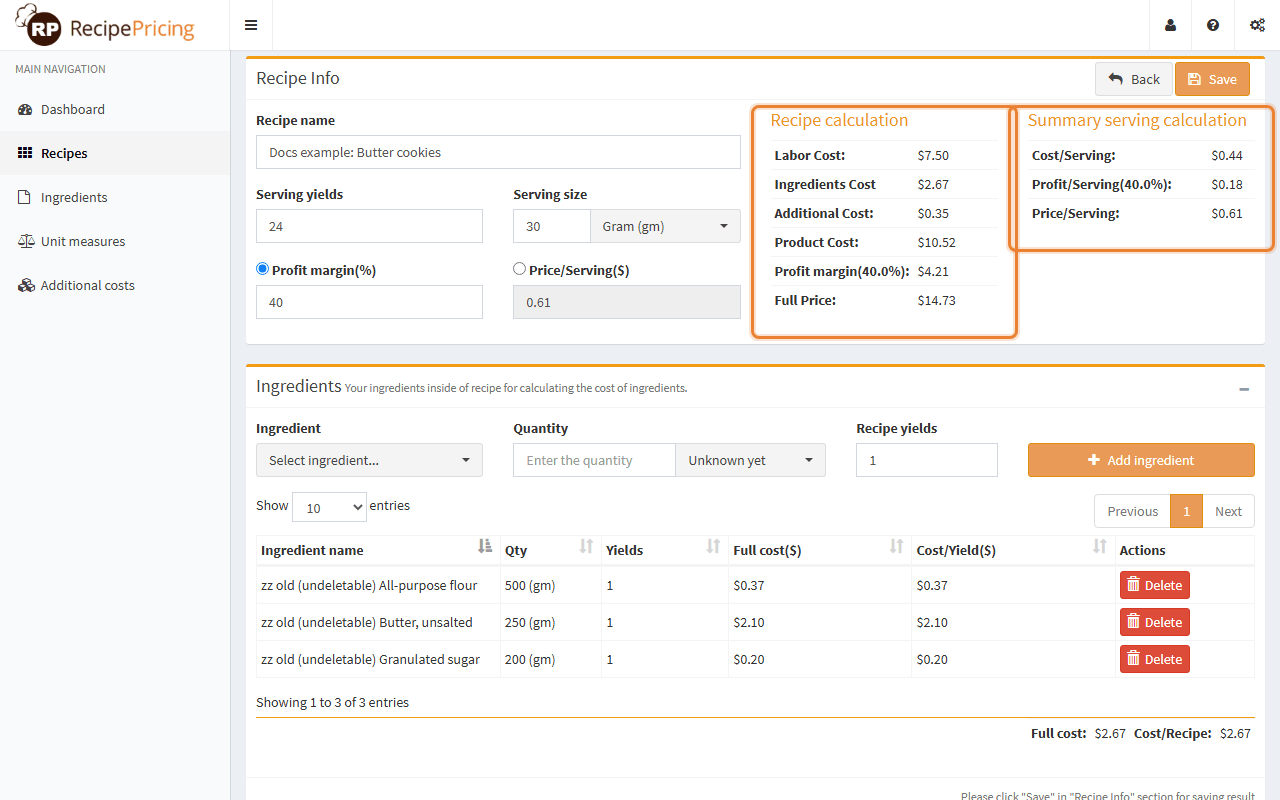
| Line | How it is calculated |
|---|---|
| Labor Cost | Sum of the Cost/Yield of the labor rows (each: workers × hours × rate per hour ÷ recipe yields). |
| Ingredients Cost | Sum of the Cost/Yield of the ingredient rows (each: price per unit × quantity ÷ recipe yields). |
| Additional Cost | Sum of the additional cost rows. |
| Product Cost | Labor Cost + Ingredients Cost + Additional Cost. This is what one batch costs you. |
| Cost/Serving | Product Cost ÷ serving yields. |
| Full Price | With Profit margin (%) selected: Product Cost + Product Cost × margin ÷ 100. With Price/Serving selected: price per serving × serving yields. |
| Profit margin | Full Price − Product Cost. The percentage in the label is the margin you entered, or, in Price/Serving mode, the margin the price gives: (price − cost per serving) ÷ cost per serving × 100. |
| Price/Serving | Cost/Serving + Cost/Serving × margin ÷ 100, or the price you entered. This is your selling price for one serving. |
| Profit/Serving | Price/Serving − Cost/Serving. |
Save and export to PDF
Click Save in the Recipe Info box. A green notification confirms the save and you return to the recipe list, where the recipe now shows its product cost, cost per serving, profit and price.
Open a saved recipe again with Edit and the toolbar has two more buttons. Export to PDF downloads a recipe sheet with the recipe information, your notes and cooking process, the cost and serving calculation, the ingredient table with quantities and costs, and the labor and additional cost tables when those sections are switched on. The PDF is made from the saved recipe, so save first if you changed something.

Export to PDF needs the Medium plan or above. Labor cost and additional cost calculation need Enterprise. On lower plans the button or toggle shows a "Low subscription" message; everything else in the recipe keeps working.
Sub-recipes: a recipe as an ingredient
Many products contain something you also make yourself: a cake with your own chocolate cream, a sandwich with your own sauce. Build the cream as a recipe of its own, then turn it into an ingredient:
- Save the recipe, open it again and click Convert to ingredient in the Recipe Info toolbar.
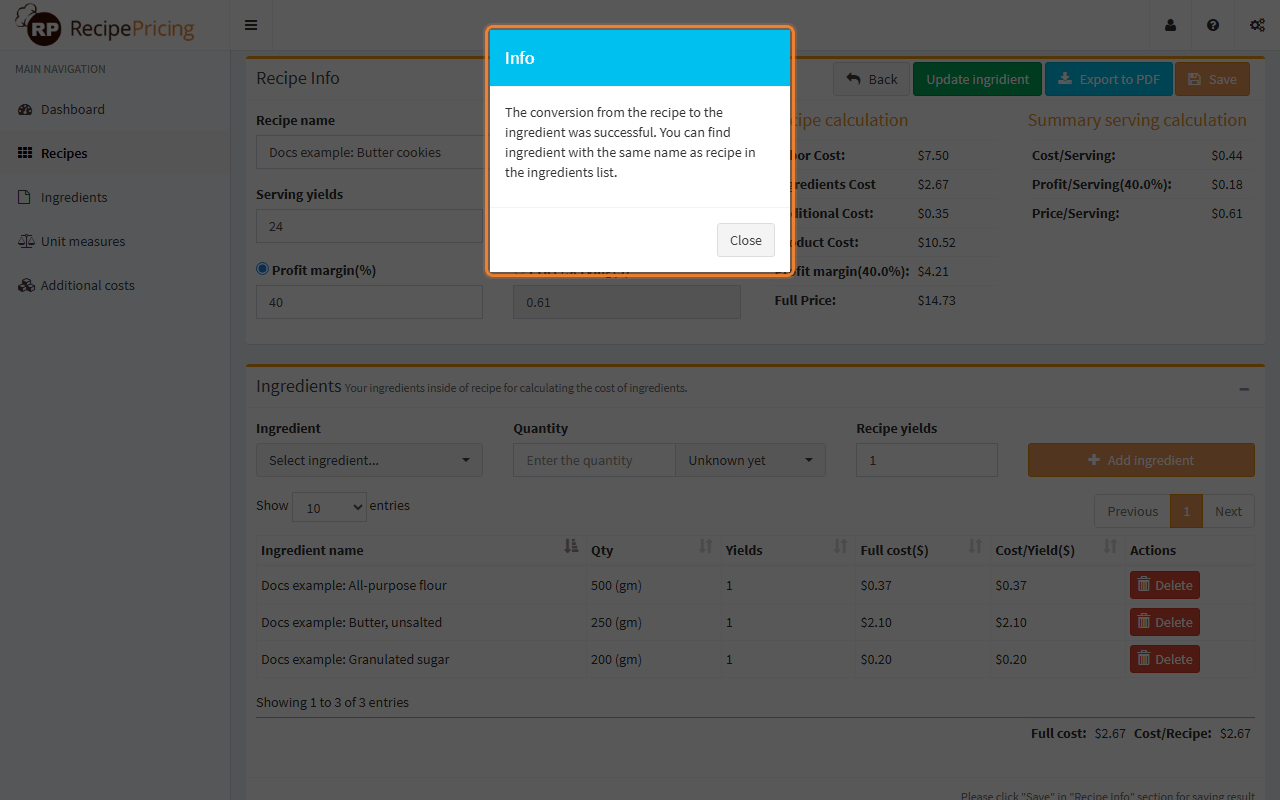
- A message confirms: "The conversion from the recipe to the ingredient was successful. You can find ingredient with the same name as recipe in the ingredients list." The new ingredient is priced from the recipe.
- Use it in any other recipe like a normal ingredient, in any unit that can be converted.
- When you change the sub-recipe later, save it, open it again and click Update ingredient (the same button, renamed) so the ingredient gets the new cost.
Sub-recipes are included from the Standard plan.
Edit, search and delete
- Edit: click Edit on a row in the recipe list. The list itself shows name, yields, product cost, cost per serving, profit per serving, price per serving and serving size.
- Search: type in the search box; the list filters by recipe name as you type.
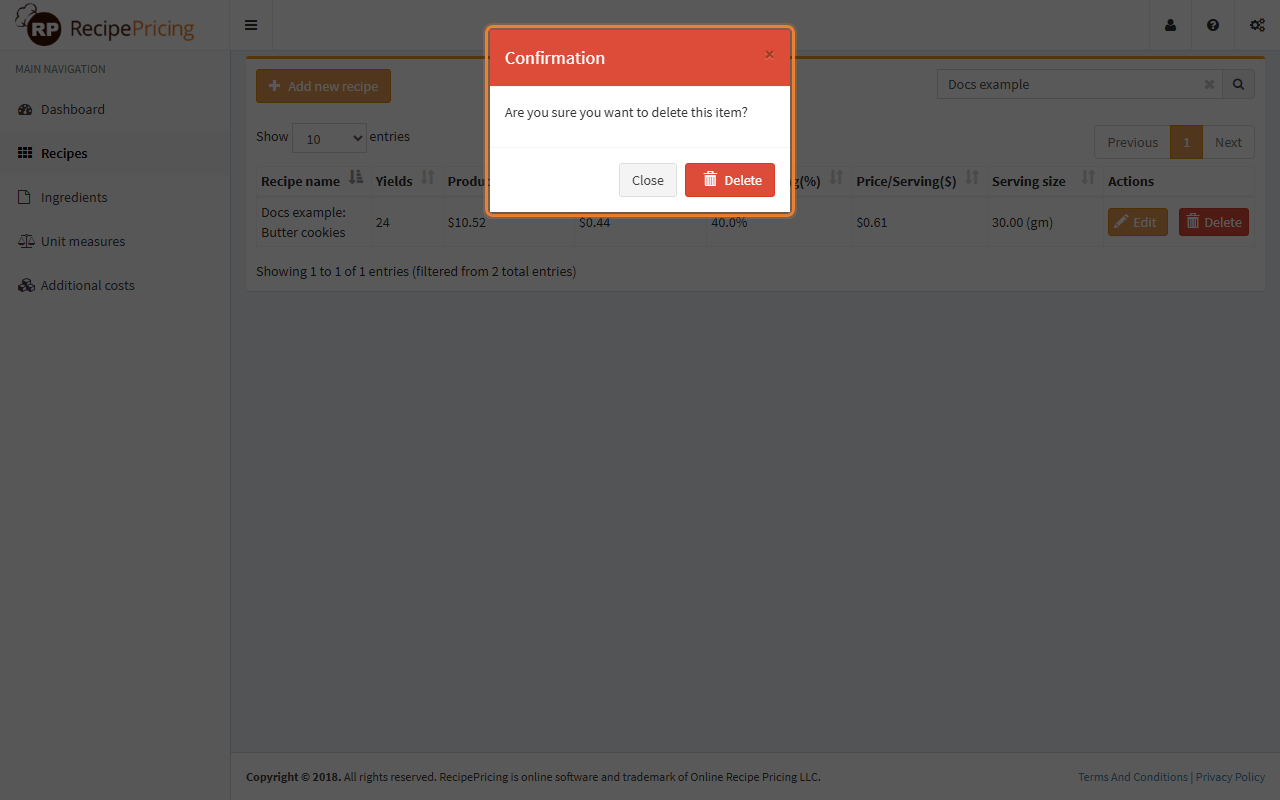
- Delete: click Delete and confirm in the dialog. Deleting a recipe does not delete its ingredients.
- Back: leaves the form. Unsaved changes are lost, so save first. Reloading the browser while the form is open also returns you to the list.
The Free plan allows 10 recipes, Standard 30, Medium and Enterprise unlimited.
7Worked example: butter cookies
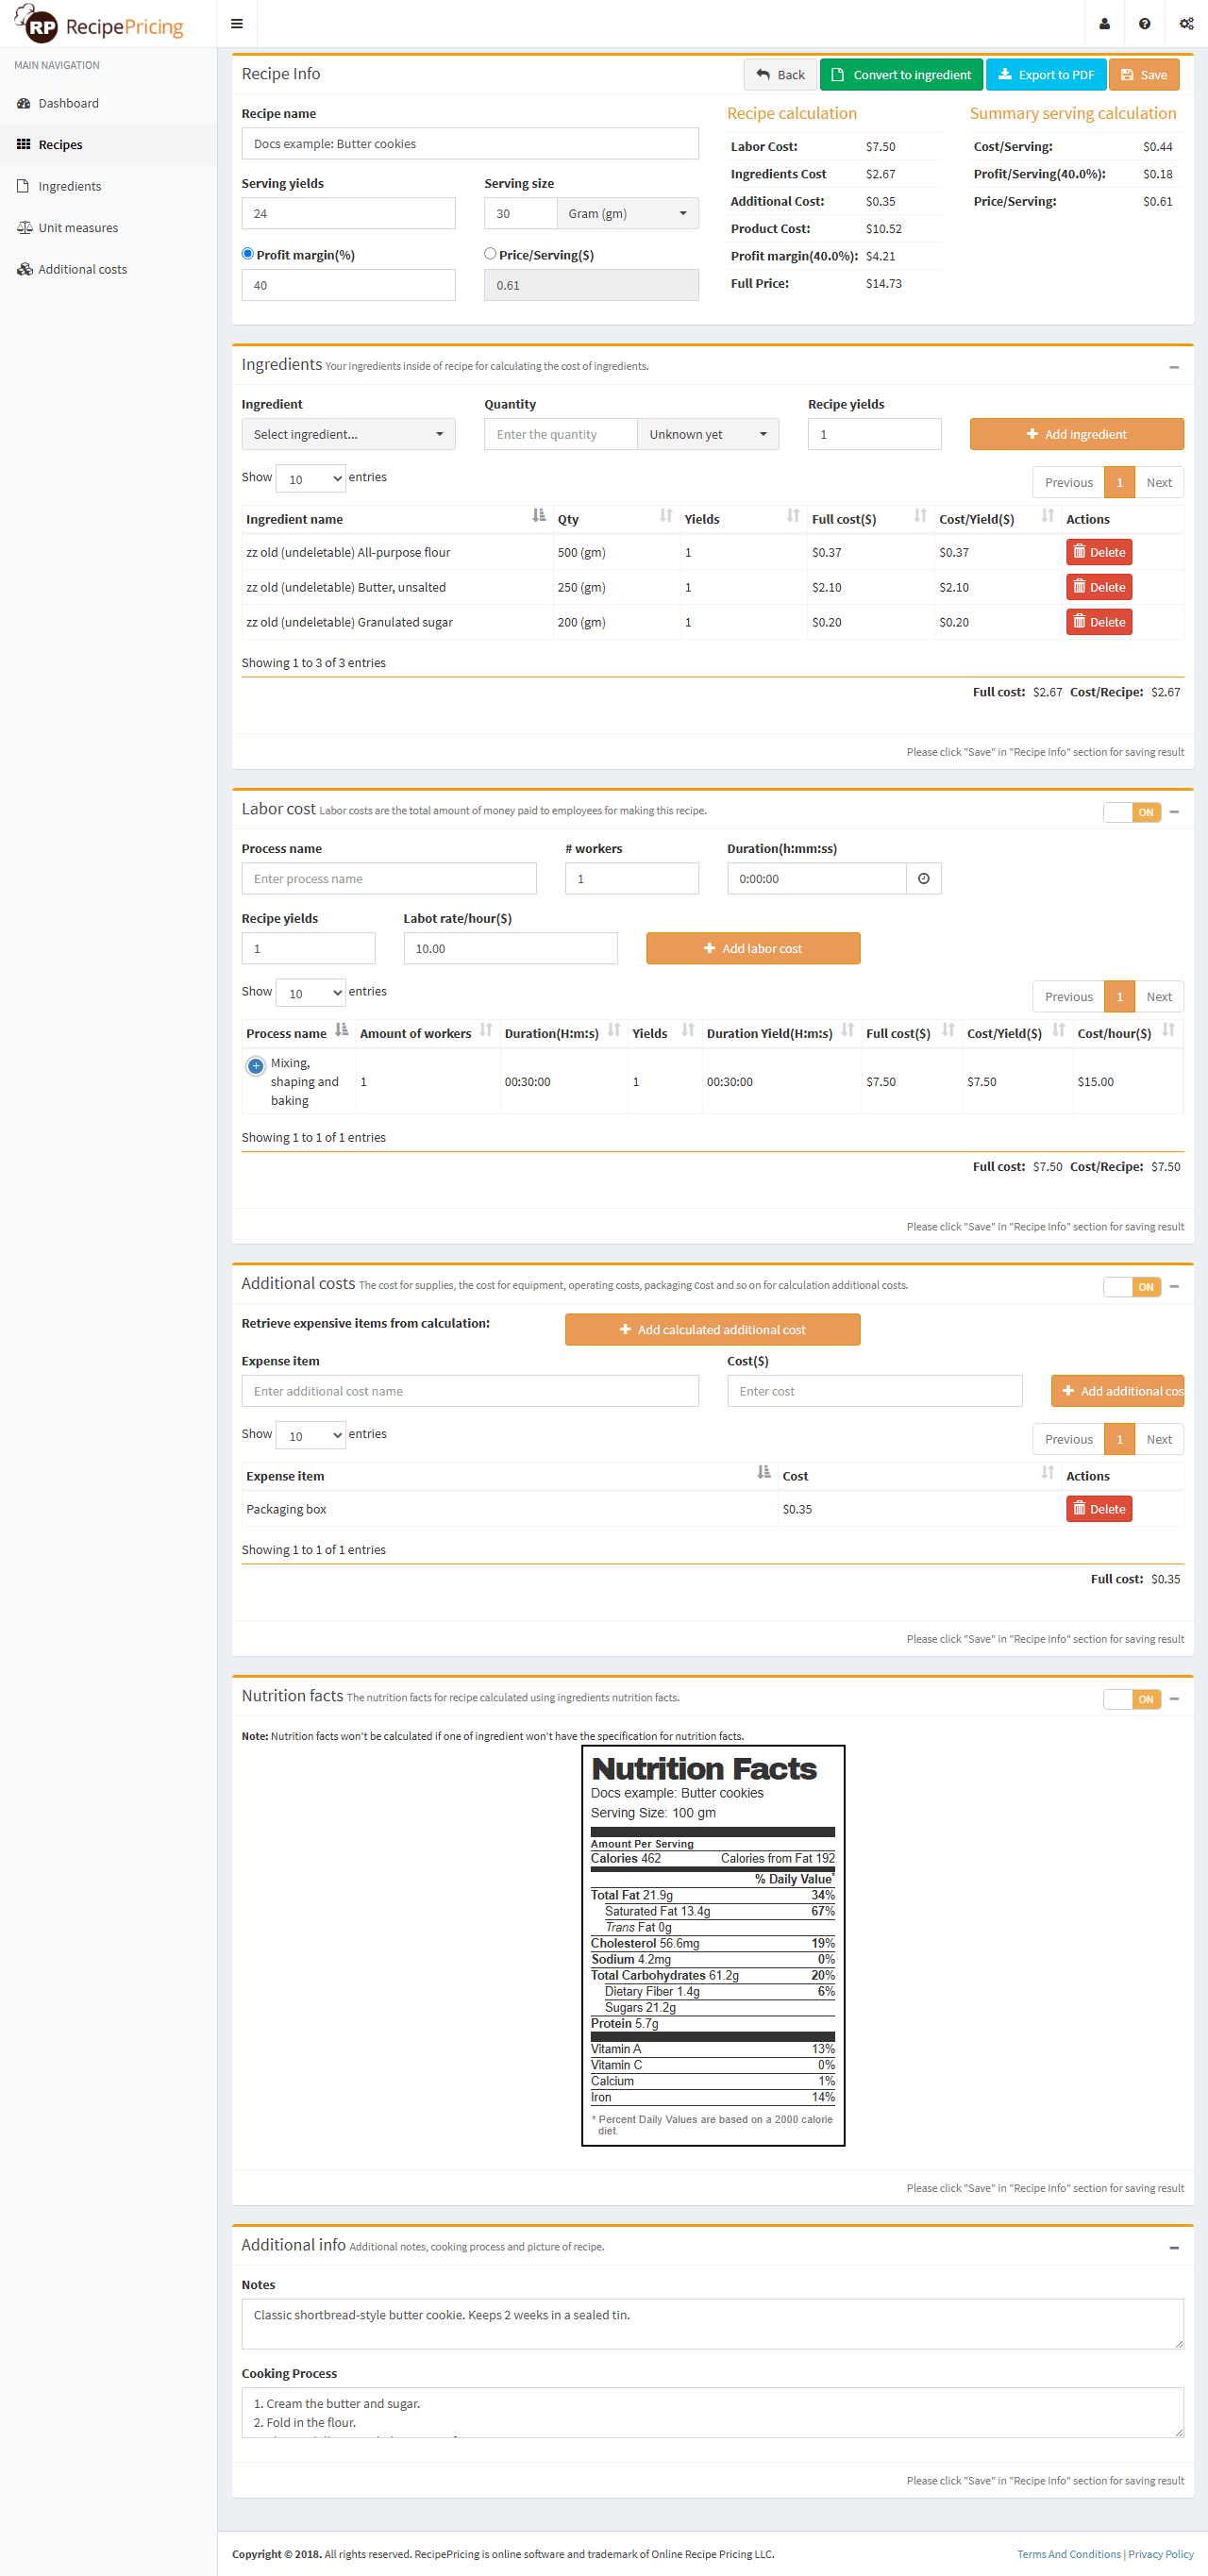
The screenshots in this guide use one small recipe. Here are its numbers end to end, so you can check your own understanding against them.
Ingredients bought
| Ingredient | Bought | Paid | Cost per kg |
|---|---|---|---|
| All-purpose flour | 25 kg | $18.50 | $0.74 |
| Granulated sugar | 10 kg | $9.90 | $0.99 |
| Butter, unsalted | 5 kg | $42.00 | $8.40 |
Recipe: 24 cookies of 30 g, profit margin 40%
| Line | Working | Amount |
|---|---|---|
| Flour | 500 g = 0.5 kg × $0.74 | $0.37 |
| Sugar | 200 g = 0.2 kg × $0.99 | $0.20 |
| Butter | 250 g = 0.25 kg × $8.40 | $2.10 |
| Ingredients Cost | $2.67 | |
| Labor Cost | 1 worker × 0.5 h × $15.00 | $7.50 |
| Additional Cost | packaging box, entered as an expense item | $0.35 |
| Product Cost | 2.67 + 7.50 + 0.35 | $10.52 |
| Profit margin (40%) | 10.52 × 0.40 | $4.21 |
| Full Price | 10.52 + 4.21 | $14.73 |
| Cost/Serving | 10.52 ÷ 24 | $0.44 |
| Profit/Serving | 4.21 ÷ 24 | $0.18 |
| Price/Serving | 14.73 ÷ 24 | $0.61 |
So each cookie costs 44 cents to make and should sell for 61 cents to earn the 40% margin. If the market price is 50 cents, switch to Price/Serving, type 0.50, and the app shows you the margin that price leaves.
8Plans and limits
Which features are available depends on your plan. When a feature is not in your plan, the button or toggle stays visible and shows a "Low subscription" message that names the plan you need. Current prices and any special offers are on the Prices page; upgrade from Pricing plans in the user menu.
| Feature | Free | Standard | Medium | Enterprise |
|---|---|---|---|---|
| Recipes | 10 | 30 | Unlimited | Unlimited |
| Ingredients | 110 | 1,000 | Unlimited | Unlimited |
| Standard unit measures | ✓ | ✓ | ✓ | ✓ |
| Nutrition fact calculation | ✓ | ✓ | ✓ | ✓ |
| Your own unit measures | – | ✓ | ✓ | ✓ |
| Sub-recipes (convert to ingredient) | – | ✓ | ✓ | ✓ |
| Export to PDF | – | – | ✓ | ✓ |
| Labor cost calculation | – | – | – | ✓ |
| Additional costs calculation | – | – | – | ✓ |
To upgrade, open Pricing plans in the user menu and click Buy subscription under the plan you want; payment is monthly or yearly. Subscription information in the same menu shows your current plan, its expiry date, whether it renews automatically, your payment history, and the button to cancel.
Your data is never lost when you change plans. If you go down to a plan with a lower limit, existing recipes and ingredients stay; you just cannot add more until you are under the limit again.
9Questions and answers
- I added ingredients to a recipe, but they are gone when I come back.
- Rows in the lower boxes are stored only when you click Save in the Recipe Info box at the top. Leaving the page with Back or the sidebar discards them.
- The unit I want is not in the dropdown in the recipe.
- The recipe offers only units it can convert for that ingredient. To use a volume unit for an ingredient bought by weight (or the other way round), add a unit conversion to the ingredient. Container units (each, pack) never convert to weight or volume.
- The recipe shows a message instead of a nutrition label.
- Either the recipe has no ingredients yet, or none of its ingredients has nutrition facts. Edit the ingredients, switch on Nutrition facts and fill in or search the values, save, and open the recipe again. Ingredients without facts are left out of the label, so give all of them facts for an accurate label.
- The additional cost per serving shows $0 or nothing.
- Enter and save the Average quantity of selling items per month at the top of the Additional costs page. Both that number and the life time must be greater than zero.
- A button says "Low subscription".
- That feature is not part of your plan; the message names the plan that includes it. See Plans and limits.
- I changed an ingredient's price. What happens to my recipes?
- Open each recipe that uses the ingredient. If a row still shows the old cost, delete that row, add the ingredient again and save. The recipe list shows the totals from the last save.
- Can I use the app on my phone?
- Yes. It is a website, so it works in any modern browser. The sidebar folds behind the button on small screens.
- Where do I get help?
- Use the contact form under Support on the home page, or email support@recipepricing.com.